The Raspberry Pi is at the center of a revolution that has put the power of a PC in the hands of the masses, providing an easy-to-use platform with a wide ecosystem of support. As intuitive and easy to use as the platform may be, both engineers and beginners can benefit from a few tips from those who have already used the Pi.
These “10 Things to Know” are not intended to be comprehensive as there is continuous online community support for that. They are some nuggets that may not be found in anyone guidebook or tutorial but have been acquired through hard-won experience. It includes advice and tips from choosing and formatting SD cards, selecting power supplies for the Raspberry Pi, choosing the right Wi-Fi dongle, programming tips, what to do when the system freezes, and how to avoid destroying the board by powering it correctly.
A quick scan through these quick tips will go a long way toward making the first encounter with a Raspberry Pi, and the power of single board computing platforms in general, an enjoyable one.
- Where and when to use the Raspberry Pi
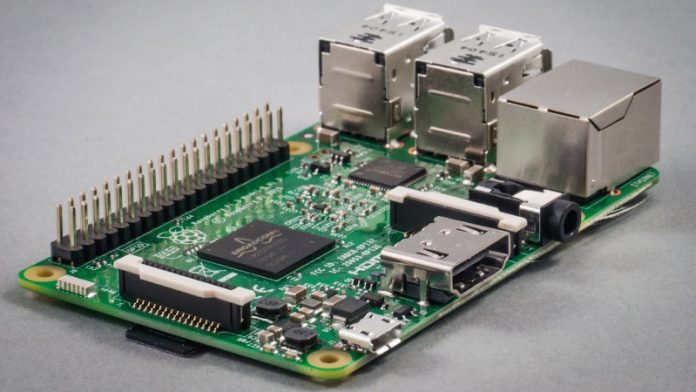
The price, performance, and support community behind the Raspberry Pi makes it really hard to not use it for every conceivable task. It’s essentially a personal computer. For example, take the Raspberry Pi Foundation’s Raspberry Pi 3 Model B. It is based on an ARM Cortex-A53 running at up to 1.2 GHz. This is supported by 1 Gigabyte of RAM, 802.11n wireless LAN, Bluetooth 4.1 and Bluetooth low energy, 4 USB ports, 40 GPIO pins, full HDMI port, Ethernet, 3.5 mm audio jack and camera and display interfaces.

While it can do almost anything from reading a temperature sensor and controlling a mechatronic system of motors and pistons, all the way to a full-scale PC, some interesting and fun projects include video manipulation, robotics, and remote 3D printer control.
2. Getting up and running with a Raspberry Pi
The Raspberry Pi is intended to run an operating system rather than just code on bare-metal. The most common OS is a purpose-built flavor of Linux called Raspbian (a portmanteau of Raspberry and Debian). It can definitely run other operating systems, but for starters stick with Raspbian.
Used as a standalone computer, the Raspberry Pi will need all of the traditional peripherals, including a mouse, keyboard, SD card (Class 10, at least 8 Gigabytes, such as Apacer Memory America’s AP8GMCSH10U1-B), and a monitor.
An external SD card reader is needed to first put a Pi image on an SD card from a separate computer. Once the image is copied over to the SD card, everything else can be done from the Pi. A good option for an SD card reader is Assmann WSW Components’ DA-70310-2 USB 2.0 reader that accommodates almost all popular memory-card formats.
To format the SD card, follow the link on the Raspberry Pi web page to get the SD Association SD Card Formatter software. Use only proven software to ensure success when installing NOOBS onto an SD card. Alternatively, purchase an SD card with NOOBS pre-installed, such as the Raspberry Pi NOOBS 16 Gigabyte card.
Opting for a wireless keyboard and mouse, such as Adafruit’s 1738, frees up the USB ports and avoids cable entanglement. Alternatively, use a powered USB 2.0 hub, such as Tripp Lite’s 4-port U22-004-RA. The 4-port powered hub is actually recommended as it lowers the demand on the Pi’s power supply.
A user can forgo the mouse, keyboard, and monitor if the intention is to SSH into the Pi, or if it is being used with a touchscreen (see tip #9).
Also, unless the monitor has an HDMI input, it will need an adapter to go from the HDMI port on the Pi to the input on that monitor. For example, to bridge from HDMI to a monitor with DVI-D, use CnC Tech’s 741-20010-00300 (Figure 2).

Later, when embedding the Pi into a system or project, these peripherals will likely be set aside.


