A classic Hall sensing system uses a single sensor in front of a magnet, but linear measurement of the magnetic field is limited to only a short displacement path unless a magnet with large dimensions is used. Certain applications cannot accommodate a large magnet in the system. A solution needs to be determined for such systems in order to achieve a good linear response through a large displacement range. In this application note we are investigating how to extend the displacement range for linear detection by using two sensor ICs, using typical Allegro MicroSystems devices as examples.
Introduction
The proposed system consists of two linear Hall sensor ICs positioned at a fixed distance from each other, and parallel to the translation path of the magnet (figure 1). The separation pitch, P, between the Hall elements of the two sensor ICs depends on the magnet length, L, and is independent of the air gap, AG. This process is known as slide-by operation.
 Figure 1. Proposed system with two Allegro MicroSystems A1363 sensor ICs and a 10 mm diameter cylindrical magnet
The measurement is based on the displacement, D, of the magnet along its polarization (north-south) axis, which is parallel to the plane formed by the two ICs. This exposes the ICs to both poles of the magnet. Figure 2 shows a typical magnetic mapping from a single sensor IC for slide-by operation with a cylindrical magnet. The proposed system has a cylindrical magnet of 10 mm length, allowing linear measurement through a displacement of 30 mm (±15 mm) approximately. The magnetic mapping from a single sensor is shown in figure 3.
 Figure 2. Slide-by operation; example of classic configuration using a single sensor IC and a cylindrical magnet
From the analysis of the mapping in figure 3, it can be observed that the region of linear response is only around the center of the magnet thus explaining why only a short path can be measured with a single sensor. Looking in more detail at the mapping, it is possible to observe that the magnetic profiles are very much similar to a sinusoidal signal over a large air gap range. If the magnetic mapping results for the two sensor ICs are considered to be sinusoidal, then a net maximum linearity range can be attained when the two signals are in 90-degree phase difference with each other.
The two sinusoidal signals with 90-degree phase difference can be processed with an arctan2 function in order to achieve maximum linearity. The expression is given by:
 where Hall1 and Hall2 are the outputs of sensor 1 and sensor 2 respectively.
Thus an optimum distance needs to be determined between the two sensor ICs so that a 90-degree phase shift can be achieved and there is less linearity error in the system. Figure 4 reports the mapping of two sensor ICs positioned in order to have a phase shift of 90 degrees. For this specific case, with a magnet of 10 mm diameter and 10 mm length, a sensor pitch of 7 mm has been chosen.
 Figure 3. Magnetic mapping of the results of a single sensor IC detecting a cylindrical magnet of 10 mm length and 10 mm diameter (slide-by configuration as in figure 1)
 Figure 4. Magnetic flux density versus magnet displacement
Figure 5 reports the arctangent and the best linear fit that represent the displacement movement. Linearity error can be calculated comparing the arctangent with the linear curve. The linearity error curves are shown in figure 6.
Analysis of of mapping data to minimize linearity error
In this section, the effect of varying the pitch between the two sensor ICs (P in figure 1) and the air gap (AG) will be analyzed for the effect on linearity error. The optimum distance between the two sensor ICs can be determined by verifying the linearity error curves at various air gaps. Figures 7, 8, and 9 report the accuracy error for air gaps of 3 mm, 5.5 mm, and 7.5 mm respectively, while varying the sensor pitch from 3 to 8 mm. It can be noted that the 7 mm pitch gives the minimum linear error overall at the various air gaps.
 Figure 5. Best fit curve for arctan2 result in order to measure linearity error
 Figure 6. Linearity error curve of magnetic system
 Figure 7. Linearity error at AG = 3 mm for various IC pitches
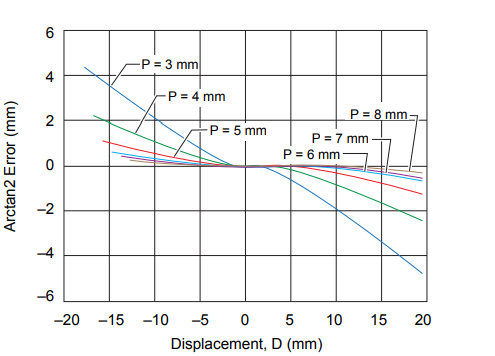 Figure 8. Linearity error at AG = 5.5 mm for various IC pitches
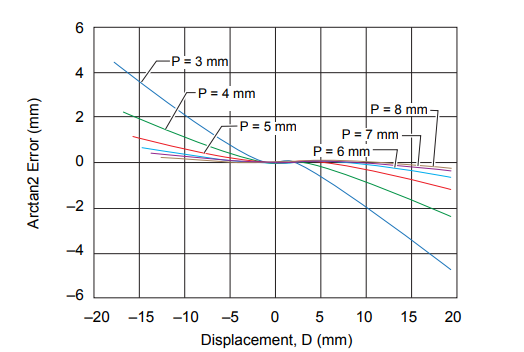 Figure 9. Linearity error at AG = 7.5 mm for various IC pitches
The sensor pitch can be considered to be independent from the air gap, so as the next step the linear error curves for a sensor IC pitch of 7 mm have been plotted for air gaps of 3 mm, 5.5 mm, and 7.5 mm (figure 10). It can be noted that linearity error reduces with the increase in air gap. At an air gap of 7.5 mm, a 30 mm displacement can be measured with an accuracy of ± 1%.
The linearity error tolerance expressed in millimeters versus displacement is reported in figure 11 for air gaps of 3 mm, 5.5 mm, and 7.5 mm, with 7 mm sensor pitch. It can be noted that similarly, error tolerance decreases with increasing air gap.
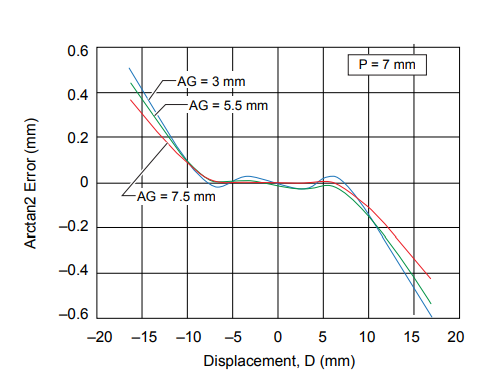 Figure 10. Linearity error versus displacement, for 7 mm sensor pitch at various air gaps
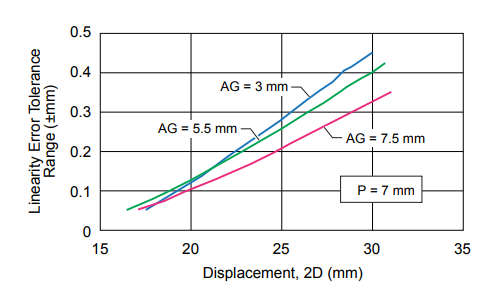 Figure 11. Linearity error tolerance range (±mm) versus absolute displacement, for 7 mm sensor pitch at various air gaps
Verification of measurements through magnetic simulations
This section presents further analysis that has been carried out for an air gap of 7.5 mm and sensor pitch of 7 mm. The previous measurements from mapping can be validated through simulations of the magnetic system. A similar linearity error analysis will be carried out with the simulation results. The tool used for the magnetic simulation is ANSYS Maxwell.
A comparison of the output plots from experimental (mapped) and simulation results for 7.5 mm air gap and sensor IC pitch of 7 mm are shown in figure 12. It can be noted that in both cases, the sensor IC response is very similar to a sinusoidal signal, as expected.
The linearity error curves using two real sensor ICs and the simulations are shown in figure 13. The error has been measured in millimeters. It can be noted that the linearity error results for the magnetic simulation are very similar as those given by mapping results for these particular dimensions of magnet.
Linearity error behaviour analysis using two Allegro sensor ICs
In this section, the effects of offset and sensitivity errors will be considered, because these errors are intrinsic in every sensor. For this purpose, a combination of two linear sensor ICs will be analyzed. An air gap of 7.5 mm and sensor pitch of 7 mm has been used. The analysis will be performed using pairs of Allegro devices, first using the A1363, followed by the A1324.
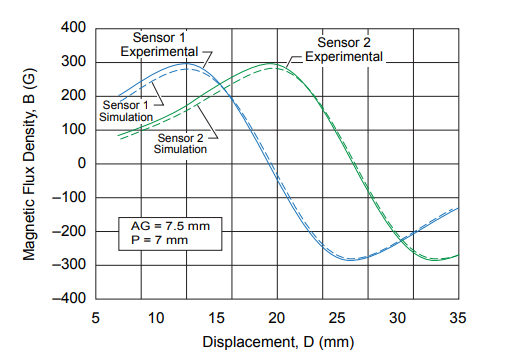 Figure 12. Hall output results for experimental and simulated values of the magnet with sensor 1 and sensor 2
A1363 device results
The Allegro A1363 is a low-noise, high precision, programmable linear Hall-effect sensor IC with high-bandwidth (120 kHz) analog output. For this analysis, an air gap of 7.5 mm and a 7 mm pitch between two A1363 devices are used.
Intrinsic sensor errors need to be considered for a realistic scenario. The sensitivity and offset errors for the A1363 device, through the full automotive temperature range, are:
- Sensitivity error calculated for A1363 sensor = 2.68%
- Offset error calculated for A1363 sensor = 4.44 G
The error numbers are based on a worst case statistical calculation of the device datasheet parameters.
The worst combination of errors for two sensor ICs has been used for the analysis. In equation 2, for sensor 1, the sensitivity error and offset errors have been added to the ideal Hall output of sensor 1. For sensor 2 (equation 3), the polarity of sensitivity and offset errors has been reversed
 The Hall voltage outputs for sensor 1 and sensor 2 are shown in figure 14, with and without shifting due to offset and sensitivity errors. Linearity error curves are shown in figure 15, with and without sensitivity and offset errors taken into consideration. The acceptable error for 7.5 mm air gap and 7 mm sensor pitch as a function of displacement is reported in figure 16.
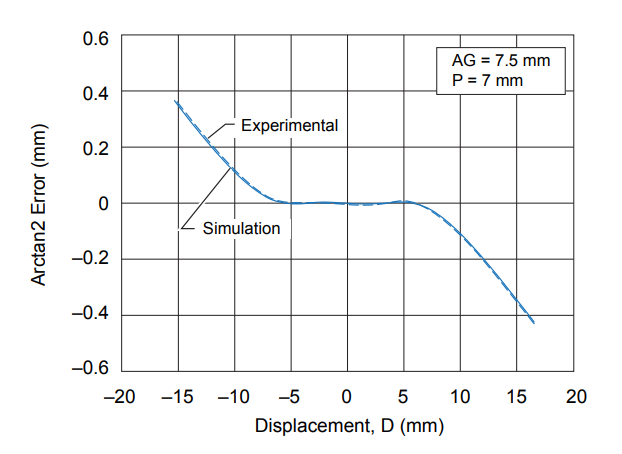 Figure 13. A1363 linearity error curves for experimental and simulation values maintaining a 7 mm sensor IC pitch and an air gap of 7.5 mm
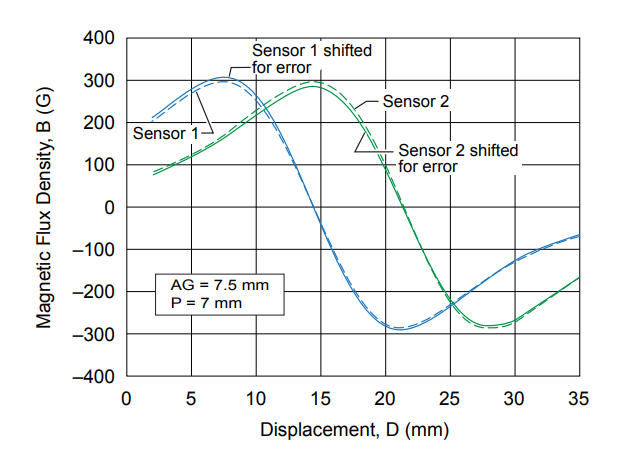 Figure 14. A1363 Hall output results with and without considering sensor IC offset and sensitivity errors
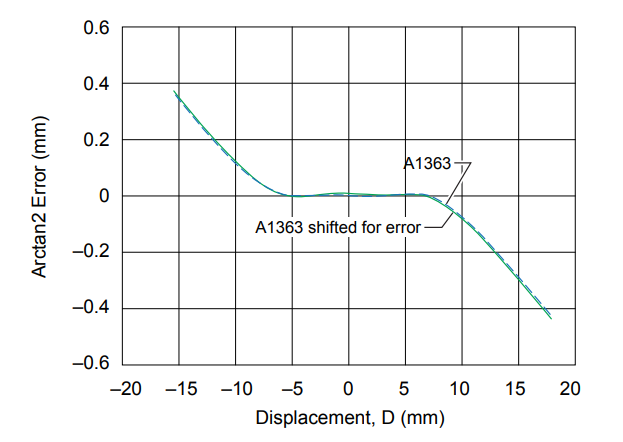 Figure 15. A1363 linearity error curves with and without considering sensor IC offset and sensitivity errors
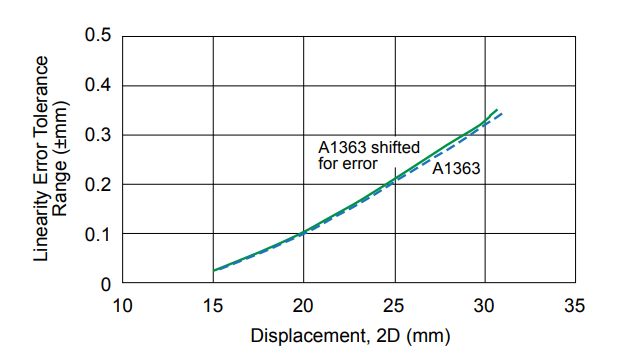 Figure 16. A1363 linearity error tolerance range (±mm) versus absolute displacement, with and without considering sensor IC offset and sensitivity errors
A1324 device results
The Allegro A1324 is a low noise, linear Hall-effect sensor IC with analog output. For this analysis, an air gap of 7.5 mm and a 7 mm pitch between two A1324 devices are used.
Intrinsic sensor errors need to be considered for a realistic scenario. The sensitivity and offset errors for the A1324 device, through the full automotive temperature range, are:
- Sensitivity error calculated for A1324 sensor = 13.61%
- Offset error calculated for A1324 sensor = 27.10 G
The error numbers are based on a worst case statistical calculation of the device datasheet parameters.
The worst combination of errors for two sensor ICs has been used for the analysis. In equation 4, for sensor 1, the sensitivity error and offset errors have been added to the ideal Hall output of sensor 1. For sensor 2 (equation 5), the polarity of sensitivity and offset errors has been reversed
 The Hall voltage outputs for sensor 1 and sensor 2 are shown in figure 17, with and without shifting due to offset and sensitivity errors. Linearity error curves are shown in figure 18, with and without sensitivity and offset errors taken into consideration. The acceptable error for 7.5 mm air gap and 7 mm sensor pitch as a function of displacement is reported in figure 19.
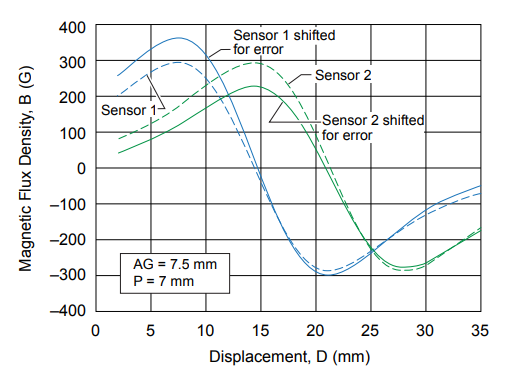 Figure 17. A1324 linearity error curves for experimental and simulation values maintaining a 7 mm sensor pitch and an air gap of 7.5 mm
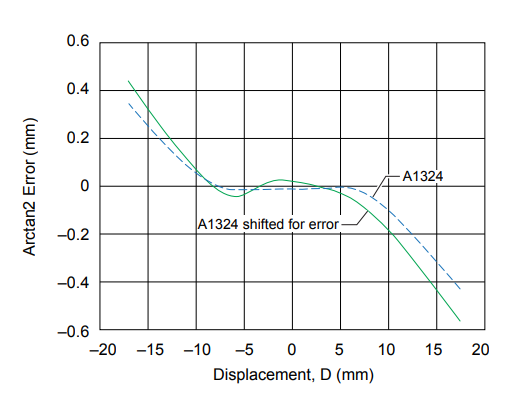 Figure 18. A1324 Hall output results with and without considering sensor IC offset and sensitivity errors
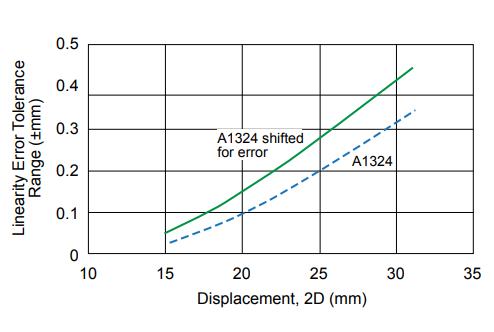 Figure 19. A1324 linearity error tolerance range (±mm) versus absolute displacement, with and without considering sensor IC offset and sensitivity errors
Analysis with other magnet configurations
Further analysis was carried out with two other cylindrical magnet configurations:
- Cylindrical magnet with diameter 5 mm and length 10 mm, which will be referred to as magnet 1
- Cylindrical magnet with diameter 10 mm and length 20 mm, which will be referred as magnet 2
The cylindrical magnet analyzed in the previous sections with diameter 10 mm and length 10 mm will be referred to as magnet 3.
The analysis performed on magnet 1, the same as that described in the previous sections for magnet 3, shows that the pitch between the sensor ICs is the same, 7 mm. The difference in diameter does not affect the sensor pitch.
It can be noted that in case of magnet 1, with smaller diameter than magnet 3, the detected magnetic field strength is reduced. This implies that the system is more susceptible to sensitivity and offset errors of the sensor ICs. Magnet 2 has instead a greater length than magnet 3 and, in order to have two sinusoidal signals shifted by 90 degrees, the two sensor ICs should have a 12 mm pitch.
It can be noted that with the longer magnet (magnet 2), larger displacements can be measured with less linearity error. For instance, a 30 mm displacement can be measured with an accuracy of ±0.03%, or a 60 mm displacement with an accuracy of ±0.5% (figure 20). The result can be improved even more by applying post-processing linearization (figure 21).
Conclusion
By using two ideal sensor ICs and a cylindrical magnet with diameter 10 mm and length 10 mm (referred to as magnet 3), a 30 mm displacement can be measured with an accuracy of ±1%.
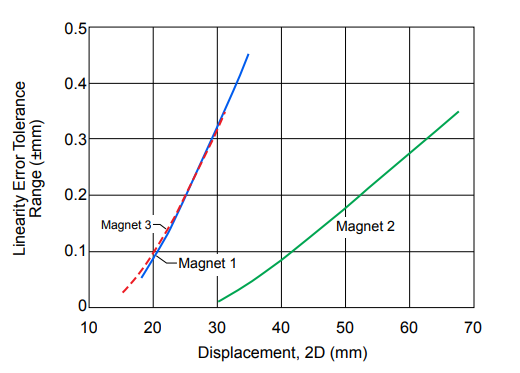
Figure 20. Comparison of linearity error tolerance range (±mm) versus
absolute displacement, for various magnet configurations
The two sensor ICs are positioned in a manner to generate two sinusoidal signals at a 90-degree phase difference; equivalent, in this case, to a 7 mm pitch.
The diameter of the magnet does not affect the maximum displacement using an ideal sensor, as demonstrated by magnet 1 but, in this case, the detected magnetic field strength reduces and a higher error is expected when the sensor IC tolerances (offset and accuracy) have been taken into account.
By increasing the length of the magnet to 20 mm as in case of magnet 2, it is possible to measure a 30 mm displacement with an accuracy of ±0.03%, or a 60 mm displacement with an accuracy of ±0.5%. In this case, the pitch of the sensor ICs should be adjusted in order to have two sinusoidal signals at a 90-degree phase difference.
When the sensitivity and offset errors of the sensor ICs are included, the linearity error is slightly affected. The increased linearity error depends on the type of the sensor ICs and on the magnetic field strength. In the case of very accurate systems, the linearity errors can be further reduced using, for example, the following techniques:
- Use more than two sensor ICs
- Use a magnet with large dimensions
- Use post-processing compensation such as linearization to correct residual error
From the above analysis, it can be noted that the magnetic simulation results correlate very well with the empirical measurements for various magnets, with regard to displacement range measurement and error tolerance. Hence, both empirical and simulation approaches can be followed.
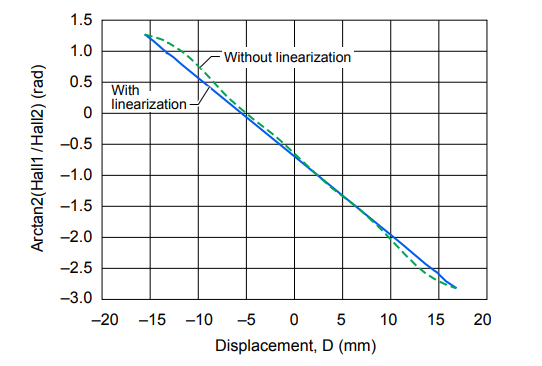 Figure 20. Comparison of linearity error tolerance range (±mm) versus absolute displacement, for various magnet configurations
 Figure 21. Effect of linearization of arctangent error curve to reduce linearity error


