Abstract
Today’s evaluation board-based prototyping for an RF design takes a significant amount of engineering time and resources, and the result still may lack the performance the final system will have once built on a single board. Prototyping RF designs with the X-Microwave modular system can dramatically reduce the time and resources needed to test an RF signal chain by enabling clean, modifiable, near-PCB prototypes through 60 GHz to be built and tested in a single afternoon. This article provides an overview of the X-Microwave platform and its advantages, as well as a step-by-step guide to getting started.
Introduction
The typical prototyping experience for an RF design includes purchasing an evaluation (eval) board for each of the components in the signal chain and using RF cabling to string the boards together, creating a rough approximation of how the signal chain would perform were it built on a single production PCB after being properly laid out. This method can accrue significant insertion loss from long eval board PCB traces and extensive cabling and connectors. The resulting prototype can also be frustrating and time consuming to bring online because of the specific voltage requirements of each eval board. It’s also not uncommon for an RF part to require multiple voltages with specific power rail sequencing, which if violated could destroy the component. Just the power and RF wires alone can create a rat’s nest, and if any board needs digital control, things get further complicated. If the whole system doesn’t work the first time you turn it on (as if!), debugging quickly degrades into an exercise in patience and perseverance. Prototyping is a headache well known in the RF engineering world—the solution to faster, easier, and more accurate prototypes is X-Microwave.
Imagine: You just finished planning your RF signal chain. You walk into the lab, grab the parts, and have a prototype constructed on the bench in 60 minutes. You connect a single 12 VDC supply, a signal generator, and a spectrum analyzer, and you’re taking measurements of PCB-like performance within a decibel of your simulations the first time you power everything up. Unsatisfied with how an amplifier is performing? Ten minutes with a hex key and you have it swapped out and are testing your updated design.

This is the prototyping experience offered by X-Microwave, a modular RF prototyping platform that allows easily modifiable signal chains to be built up in under an hour without any specialized tools. These signal chains are composed of X-Microwave blocks—connectable single-IC RF boards—and there are parts in the ecosystem that support frequencies up to 60 GHz. The RF connections, solderless contacts secured by hex screws, are robust and simple to install. The signal chain is much easier to power and digitally control than eval boards, requiring a single 12 VDC supply to the control board and either a Raspberry Pi, FPGA, or other driver of your choice. The X-Microwave modular design enables fast signal chain edits, reduces debug time significantly, and keeps the prototype compact, clean, and portable.
The X-Microwave Solution
Engineers can use X-Microwave to get the performance of an end-design single PCB with the prototyping speed and modifiability of evaluation boards. An X-Microwave prototype is made up of small, single-IC blocks that can be strung together to create a signal chain. From amplifiers to mixers, switches, PLLs, and VCOs, the X-Microwave ecosystem has thousands of RF blocks available to support a variety of full signal chains. Each individual RF block comprises a single RF IC, either a packaged part or die, with the surrounding passives required for optimal function and matching. X-Microwave takes special care with the RF layout and design to ensure the device performs as close to data sheet specifications as possible. On each RF block, grounded coplanar waveguide traces run from the IC to launches on the edges of the block. RF connections are made from these launches to the neighboring block using solderless ground-signal-ground (GSG) interconnects. These interconnects closely resemble continuous PCB traces, allowing the X-Microwave prototype’s overall performance to much more accurately represent final system performance than a large connection of eval boards. X-Microwave’s GSG jumper connections each have an insertion loss of just fractions of a decibel, and as the number of components in the signal chain increases and more interconnects are needed, the difference in insertion loss between X-Microwave and SMA-linked evaluation boards becomes even more pronounced.

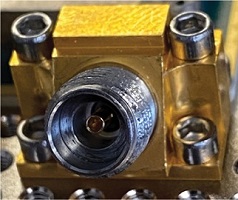
The RF blocks are mounted together on a protoplate, with SMA probe blocks attached to the ends of the signal chain to get the RF signal into and out of the board. X-Microwave also has walls and lids available to enclose RF blocks, allowing you to simulate cavity effects.

Dedicated bias and control boards mounted on the bottom of the protoplate provide power and control signals. Each individual active RF X-Microwave block pairs with a dedicated bias and control board that has the circuitry needed to supply the regulated voltages, power sequencing, and digital control required by the RF component. The bias and control board attaches to the bottom of the protoplate directly underneath the RF board it is supporting, making an electrical connection to the RF board above with spring pins. With the power sequencing and bias taken care of by these dedicated blocks, the prototype designer is free to focus on what really matters in their design—RF performance.
X-Microwave prototypes behave significantly more like the end design than a string of evaluation boards, and this difference becomes more pronounced as the number of components in the RF chain increases. By proving the design with an X-Microwave prototype, you can be much more confident in your evaluation, minimizing PCB iterations and accelerating the development process.
Putting It All Together: Prototyping Your RF Signal Chain
Creating an RF design with X-Microwave is similar to designing any other RF signal chain. To quickly find the X-Microwave block you need, X-Microwave has a component search function that can filter by type, specification, and manufacturer. If you’re looking on the IC manufacturer’s site, an X-Microwave banner is typical on webpages for parts that are supported by the ecosystem.


Once you have selected your parts, the next step is simulating your proposed signal chain. Keysight’s Genesys® software, an RF simulation tool, has a built-in library with X-Microwave models. These X-Microwave models simulate the RF X-Microwave blocks from launch to launch without de-embedding the traces, improving the simulation accuracy of the X-Microwave board compared with de-embedded IC simulations. The extensive X-Microwave library provides models for many parts that don’t have Genesys models directly from the IC’s manufacturer.
After running simulations and reaching a performance you’re satisfied with in Genesys, it’s time to move on to X-Microwave’s layout tool—where you can complete an entire RF layout (including adding power!) in under an hour. The layout tool can be accessed online through X-Microwave. RF engineers can use the layout tool to plan a placement map of the X-Microwave blocks in the signal chain on the protoplate. Once you place the RF blocks, add the bias and control boards automatically with the single click of a button. All components used in the signal chain update live in the bill of materials (BOM) in the upper right, where you can also find an Export CSV button. The .csv file contains a BOM that you can send to X-Microwave for a formal quote when you’re ready to move on to ordering.

In addition to the RF blocks, bias, and control boards needed to make up the signal chain, you will notice a few additional parts on your BOM that are required to electrically connect and mechanically mount the blocks. First, the protoplate—these are sold in two sizes, 32 × 32 and 16 × 16, with the 32 and 16 referring to X-Microwave grid units or the spacing between the screw holes on the board. You will also need GSG jumpers and anchors. GSG jumpers are small, flexible, rectangular circuits that are placed across the launches of bordering RF blocks to form an RF connection. Anchors are screwed in across the GSG jumpers to secure them to the RF blocks and ensure a continuous electrical connection.

Connecting an external RF signal source into the signal chain requires an X-Microwave probe. There are two different probes available, 2.92 mm and 1.85 mm, depending on the frequency being used. The 2.92 mm is advertised as good through 50 GHz, while the 1.85 mm is advertised as performing above and beyond X-Microwave’s 67 GHz testing ceiling. You will also need screws to attach everything to the protoplate. Up to seven different screw lengths may be used in total, from the shortest for attaching bias and control boards to the longest for attaching X-Microwave wall edges with a lid on top. Finally, the tools needed for connecting all the pieces—a 1/16″ hex key to tighten the screws, and tweezers to place small things in tiny spots. Once your RF and bias and control blocks arrive, follow the map you made with the X-Microwave online layout tool to put your board together.
Now, all you need before testing is to power the boards and hook up digital control. To connect power and digital control to the bias and control boards, the AD-FMCXMWBR1-EBZ bridge board is your best option. It provides up to eight GPIO lines, two full SPI buses with eight chip select lines each, and two full I2C buses. The bridge board also affords two different modes of digital control: (1) a Raspberry Pi connected directly to the bridge board, driving the chain with something as simple as a few-line Python script, or (2) an FPGA, interfaced with the X-Microwave signal chain through the FMC connector on the bridge board, enabling the development and test of near-production software alongside the hardware prototype. A single 12 VDC supply connected to the bridge board provides seven distinct voltage rails for the X-Microwave signal chain, three of which are adjustable using potentiometers. A few other settings, including bridge board level shifters, can be selected using jumpers. Finally, the bridge board connects to the X-Microwave prototype with only two cables, resulting in a distinct lack of clutter on the RF lab bench—a stark contrast to its usual state as a maze of banana cables and alligator clips. The bridge board takes the already compact and clean X-Microwave RF prototype and adds an elegant solution for digital control and power, making for an overall minimal hardware solution size that is extremely portable and well-suited for demonstrations and travel. The only additional equipment required to showcase an X-Microwave prototype is an RF source and an RF measurement tool.
A clean lab bench and modular ecosystem enable faster and more productive debugging, getting you to production with less headache and fewer engineering hours.

Conclusion
X-Microwave is the solution to (almost) everything painful about conventional evaluation board RF prototyping, an art that has traditionally taken more than its fair share of engineering hours and frustration. X-Microwave is today’s faster and more accurate prototyping process to 60 GHz, enabling more compact and easily modifiable designs for simple signal chain debugging and experimentation. X-Microwave prototypes are also extremely portable when used with ADI’s FMC-X-Microwave bridge board, requiring only a single 12 VDC supply for power and a Raspberry Pi for digital control, making each signal chain a demo that can fit in a small shoebox and be set up in less time than it takes a slide deck to load. This level of performance could understandably be more expensive than current prototyping practices, and yet except for the one-time start-up costs, prototyping with X-Microwave often has a cost comparable to that of building the system with eval boards. Some X-MWblocks are actually more economical than their eval board counterparts, even before considering the benefits that reduced engineering time brings to your bottom line.


