

The Purpose of Transport Layer Security
The purpose of TLS is to contribute to the embedded security pillars:
- Confidentiality (encrypt the data)
- Integrity (protect data from tampering/corruption)
- Authentication (establish trust between client and host)
TLS and authentication work hand in hand. TLS will initiate and perform the cryptographic operations to establish an authenticated and encrypted tunnel of communication. The secure element will store and protect the relevant cryptographic keys solicited by the TLS protocol, the private key being by far the most critical one. Continue reading to understand why encryption is weak without a robust secure key storage to protect, at the very least, the private key.


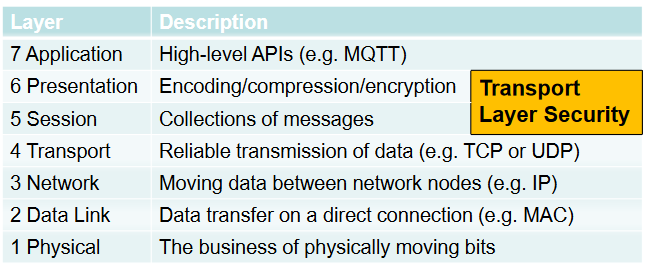
TLS is used to secure website-to-website communication but also Internet Protocol (IP)-based Internet of Things (IoT)-connected devices. The Open Systems Interconnection (OSI) model is conceptual, and most technologies don’t fall neatly into these layers. Below shows where the TLS sits between the session and presentation layers.
TLS and Authentication
An essential part of the TLS is the authentication phase. For the IoT market, it is common practice that both the cloud platform and the IoT device authenticate each other—it’s called mutual authentication. The most common technology used leverages X509 certificates and public key infrastructure because it simply keeps the processing power needed to run the computing hungry cryptographic algorithms as optimized as possible on the embedded deices and keep them relatively affordable. There are several standards such as IoT Consumer EN303645, IoT industrial IEC/ISA62443, EV charging ISO15118 and Open Charge Point Protocol (OCPP), which all recommend the usage of secure key storage for the TLS. ISO15118 will even tell us that if the private key is controlled by an attacker and if the financial transaction associated to the payment of the charge to be delivered to the vehicle can be impersonated and consequently stolen. Furthermore, if your private key is stolen, the attack can trickle through an entire network.
Let’s dive into the authentication principles:
- Digital Signature Algorithm (DSA)
- Certificate signing
- Certificate verification
- Certificate authentication
Digital Signature Algorithm (DSA)
Here we explain the basics of how a digital signature algorithm works:
- DSA uses the concept of host and subject.
- The host sends a message to the subject. Each of them has their respective public/private key pair where the public key is calculated out of the private key
- The subject public key is distributed to the host
- The subject will provide an answer called the signature
- The signature is the output of a cryptographic “sign” operation of the message using the subject private key.
- The host will then verify the signature with the subject public key.
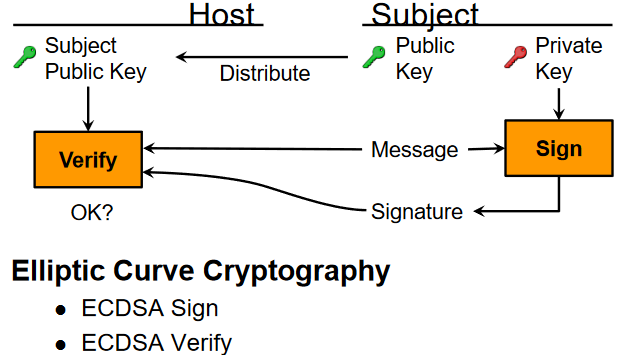
Now we have a challenge (the message) that was signed by the private key and obtained a signature that’s verified by the host public key. Remember: the private key signs, the public key verifies.
Certificate Signing
Let’s increase the scope and extend the DSA concept to X509 certificates used in TLS and what portion of the certificate is signed. Let’s also introduce the notion of authority and subject relationship. Both have their public/private key pair. We are starting to relate to a certificate chain using Public Key Infrastructure (PKI). The PKI could be built upon a chain of certificates with a certificate authority at the top of the chain: the authority.
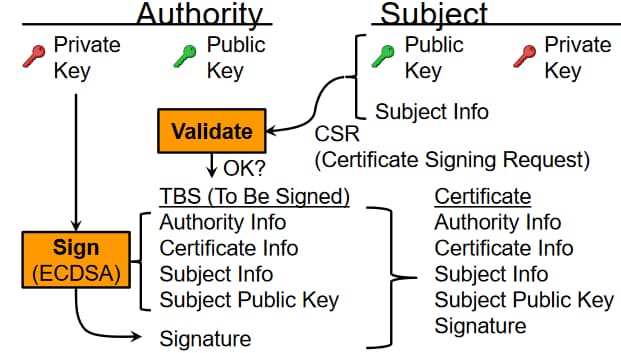
- The subject sends a Certificate Signing Request (CSR) to the authority
- The authority will validate it with its public key
- Once the CSR is validated, the “To Be Signed” (TBS) portion of the certificate will go through the DSA discussed prior. In this illustration, we will specifically refer to the elliptical curve digital signature agreement (famously known as ECDSA).
- The portion of the certificate to be signed contains:
- Authority information
- Certificate information
- Subject information
- Subject public key
- Then we need to append the signature at the end of this set of data to go to the next concept.
Certificate Verification
In the previous step, the certificate was signed with the authority private key, creating a binding between the subject and the authority, but the binding is not complete yet. The host needs to verify the signed TBS portion of the subject certificate can be trusted:
- The subject provides to the host (different from the authority) his TBS and the signature.
- The host uses the authority public key previous distributed to it and uses it to verify the signature of the subject and collects the TBS of the subject.
- The verification is done in our case using an ECDSA verify.
Now the certificate is verified, let’s discuss the actual certificate authentication.
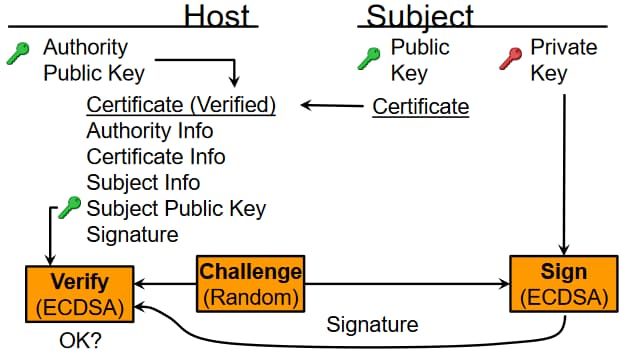
Certificate Authentication
- The subject will send its certificate to the host which has the authority public key
- The subject certificate contains the subject public key
- The host will send a random challenge (also called a nonce) to the subject which will sign it with an ECDSA sign operation and using the subject private key.
- The signature is sent back to the host which will verify it with the subject public key previously distributed.
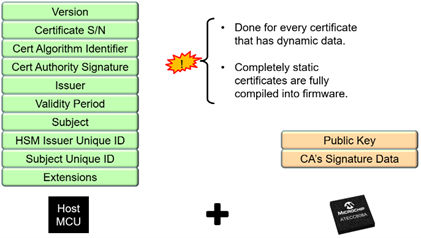
Here is a different look at a certificate. We can understand what is signed, what is the static part of the certificate and what is the dynamic part of the certificate. CryptoAuthLib is the library that’s used with our secure element and handle the parsing of the static and dynamic portion of the certificate. The public key, signature and private key are what will be handled by the necessary cryptographic operations inside the secure boundary of the secure element.

Encryption and Integrity
Now that the foundational concept of authentication has been covered, we can go over the encryption and integrity concepts and how TLS takes care of them.
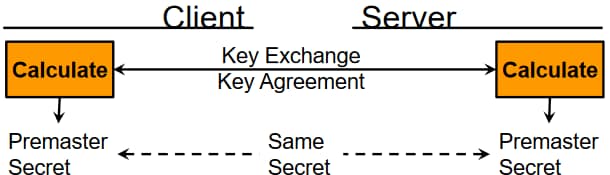
The idea here is that the client and, in the IoT world, the server create the concept of forward secrecy. For that, we need the generation on the fly of temporary symmetric keys also called ephemeral keys. Generally, asymmetric operations are slow and consequently symmetric keys are used for encryption and integrity. We need to start with a key exchange (also called key agreement). The server and the client with calculate a pre-master secret that’s identical on each side.
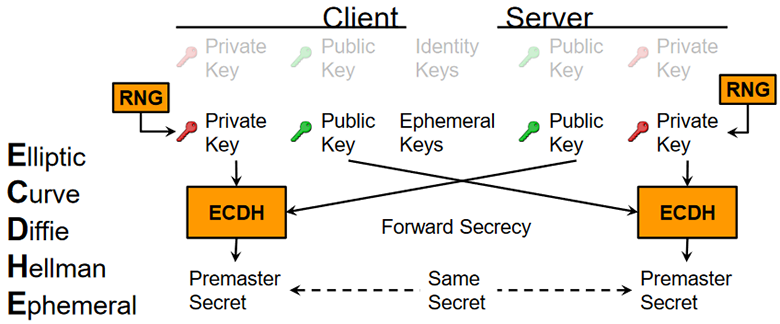
In cryptographic terms, we will use an elliptic curve Diffie Hellman Ephemeral (ECDHE) operation illustrated below.
- Each client and server issue a random number representing their own unique private key
- On one side, the private key is run through an ECDH but uses the other side public key to compute the pre-master secret.
- The other side will perform the same operations
Each side now have an identical pre-master secret. Next, we need a Pseudorandom Function (PRF) that generates additional key material:
- Client and server encryption keys
- Client and server Initialization Vectors (IVs)
- Client and server Message Authentication Code (MAC) keys
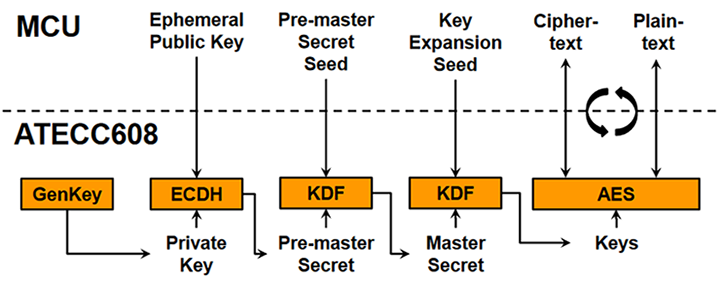
If we refer to the ATECC608 or TA100, they both have something called the Key Derivation Function (KDF) in PRF mode necessary to implement the TLS1.2 PRF with HMAC/SHA256. Let’s look at what PRF does inside the TLS.
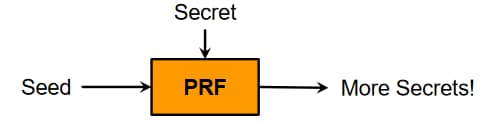
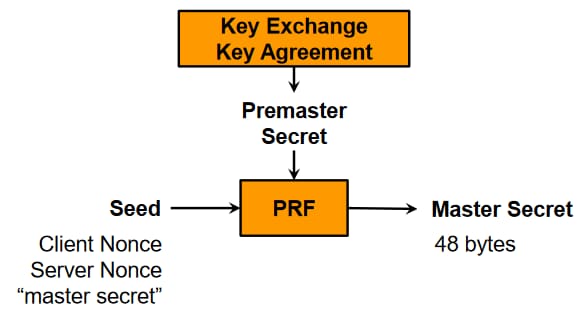
From the premaster secret, the PRF generates more secrets! From the premaster secrets, we will run the pre-master secret along with a seed through another PRF to compute the master secret generally long of 48 bytes.
The “seed” is composed itself of the client nonce, the server nonce and the master secret.
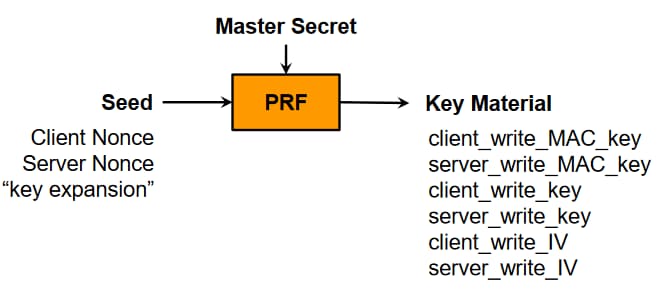
Finally, we get into the key expansion phase which takes the master secret from the previous phase, the seed which contains the client nonce, the server nonce and the “key expansion.” Both the seed and the master secret are run through the PRF to output the key material.
Note that there are separate encryption and integrity checks:
- AES128 CBC for encryption
- HMAC-SHA256 for MAC
But there are also combined encryption and integrity checks:
- Authenticated Encryption with Associated Data (AEAD)
- GCM – Galois Counter Mode
- CCM – Counter with CBC-MAC
Below we are illustrating the symmetric cryptographic flow the ATECC608 or the TA100 would implement. It illustrates how forward secrecy is established using the discussed steps.
TLS Handshake and Cipher Suites
TLS was built to be very flexible and offers different cipher suites. Each cipher suite is composed of multiple crypto parameters which we just reviewed in this blog post.
- Key exchange algorithm
- Authentication algorithm
- Cipher
- Algorithm, key strength, mode
- MAC or PRF
You can refer to an extensive list of cipher suite at the following link. If you consider all the existing cipher suites, you have to consider what the restrictions are of your embedded system. Embedded IoT devices such as smoke detectors or surveillance cameras do not have the horsepower of a datacenter—you would think it’s obvious, right? Think twice. Generally, embedded systems have minimum compute power, limited memory and restricted power and security hits all three of them as cryptographic can be compute hungry, consequently impacting power. For that matter, we will focus our example on the following cipher suite, the ATECC608 excel, at as it provides a very cost-optimized architecture and high level of key protection (common criteria Joint Interpretation Library (JIL) high): TLS_ECDHE_ECDSA_WITH_AES_128_GCM_SHA256 and let’s decompose it :
- ECDHE Key exchange/agreement algorithm
- ECDSA Server authentication algorithm
- AES Cipher algorithm
- 128 Cipher strength
- GCM Cipher mode
- SHA256 PRF (Pseudo Random Function)
- Cipher mode is AEAD (combine encryption and integrity check)
The last portion specifies PRF algorithm.
Do you need an RSA? Consider the TA100 and the following cipher suite: TLS_ECDHE_RSA_WITH_AES_128_CBC_SHA256. We have seen it used in automotive applications but also in Linux® based applications like gateways where network cipher retrofit is needed because old connected equipment, still critical to the infrastructure, runs on the network with RSA. Similarly, we have the following cryptography:
- ECDHE Key exchange/agreement algorithm
- RSA Server authentication algorithm
- AES Cipher algorithm
- 128 Cipher strength
- CBC Cipher mode
- SHA256 MAC (Message Authentication Code)
It separates encryption and integrity check algorithms. The last portion specifies MAC algorithm.
As you can see, the ECC private key or RSA private is the secret that is the most important foundation to securely establish a TLS session. If that key is exposed or accessible, any encryption relying on it is as weak as the key is exposed. So, the private must be protected by isolating it in the ATECC608 of TA100 secure elements. That way, the private key is “air gapped” from code, users, developers and manufacturers. This isolation is even more reinforced when using Microchip secure provisioning service. Here is a set of cipher suites the TA100 will support as an example:
TLS1.2 : TLS_ECDHE_WITH_AES_128+CBC+SHA256 RSA AES_123 CBC SHA256
TLS1.3 : TLS_AES_128_GCM_SHA256
TLS1.3 : TLS_AES_128_CCM_SHA256
TLS1.3 : TLS_AES_128_CCM_8_SHA256
How to Implement TLS With the ATECC608 or TA100: Trust Platform Design Suite
Let’s get hands-on with code and hardware and look at the implementation details. First, download the Trust Platform Design Suite. There are several TLS use cases available there with simplified transaction diagram and turnkey C-code projects to help you get started with our secure element, microcontroller and WiFi module:
- Trust&GO ATECC608 for AWS IoT
- Trust&GO ATECC608 for Microsoft Azure
- TrustFLEX ATECC608 for AWS IoT
- TrustFLEX ATECC608 for Microsoft Azure
Outside TPDS, you can find a code example from WolfSSL and mbedTLS, leverage PKCS#11 for Linux® platforms.
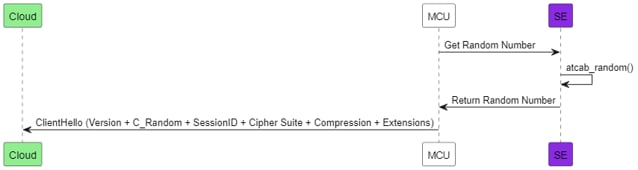
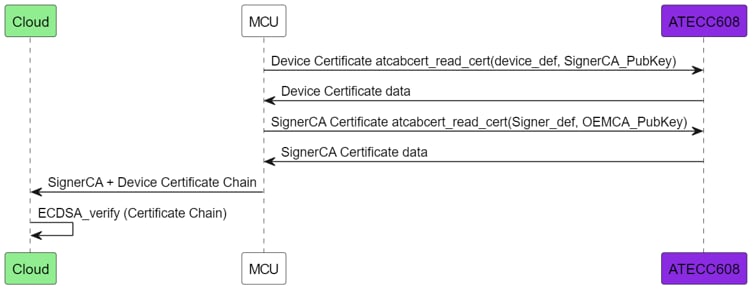
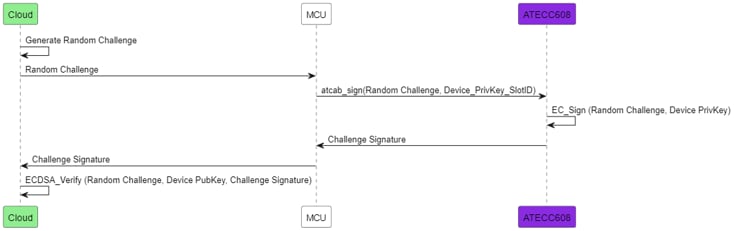
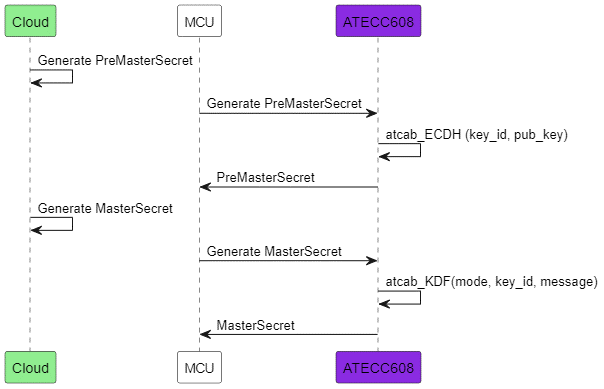
Now we will detail the actual transaction diagram of the TLS involving the ATECC608. The TA100 would be conceptually similar (use talib instead of atcab for the API calls). The graphics below focus mostly on the CryptoAuthLib call backs between the microcontroller unit (MCU) and the ATECC608. You will identify them easily by searching the “atcab” API calls.
- Client Hello
- Server Hello
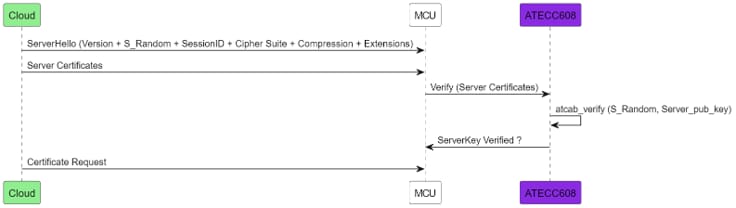
- Send Client Certificates
- Verify Client Private Key Ownership
- Generate Shared Secret
And that’s how the TLS with secure element is implemented.
Authored Article by: Xavier Bignalet, Microchip