


With so many people working from home now, maintaining an efficient workflow has become quite the challenge, but robotics can help solve that! And my robotic assistant aims to do just that.
Parts list


| Qty | Product |
| 1 x | Micro Servo |
| 2 x | DC Motor |
| 1 x | Ultrasonic Sensor |
| 1 x | Motor Driver |
| 1 x | Li-Po Battery |
| 1 x | ESP8266 |
| 1 x | Camera + FTDI Modules |
| 1 x | Wheels (pack) |
With so many people working from home now, maintaining an efficient workflow has become quite a challenge, and I propose the following solution: a desktop robotic assistant. And no, I don’t mean a cute little guy that keeps you company and responds to your pets, but rather, one that will boost productivity and bring us a step closer towards incorporating robotics in the house.
Remember those scenes in movies where the doctor says “scalpel!” and the nurse hands them a scalpel and they look really cool? This idea is derived from that. A robotic assistant is a versatile machine that could help with a variety of tasks around the house such as cooking, cleaning or in my case, building other robots. Let’s take my case as an example. Often, when I’m working on a robot for a long period of time, my worktop ends up disorganised. And with so many little electronic components, it can be hard to quickly find the one I need. The robotic assistant provides a solution to this.
Here’s how it works. A small camera module goes attached to the ceiling, facing down, getting a clear view of the worktop and everything on it. This camera feed goes into the micro-controller, where it can be analysed by a machine learning algorithm such that the AI is able to identify what every object on the worktop is and where it is. Upon receiving a voice command such as “Bring me the insulating tape”, the robotic assistant is then able to travel to the coordinates that correspond to that item and push it across the worktop, following the optimal path worked out by the AI, avoiding other items in the way and taking the least amount of time to get from its original position to my right hand. Furthermore, the robotic assistant can remove and deliver drawers from its storage system containing the myriad of resistors, capacitors, LEDs, wires and other electronic components. This is done through the use of an ‘arm’ that can be controlled with a micro servo that simply latches on to the drawer’s handle so that the robot is able to drive back, and remove the drawer. When not in use, the arm folds back and out of the way.
The robotic assistant can be easily adapted to fit the needs of anyone. For instance, it can help in the kitchen, by delivering spices and utensils, eg. “Bring me the oregano”. Or it can help kids studying from home, by keeping their desks organised and supplying stationery. Much like robotics have revolutionised industrial processes, the robotic assistant is a friendly way of introducing robotics into the home, that in the future will change the way we interact with the world around us for the better.
Technicalities
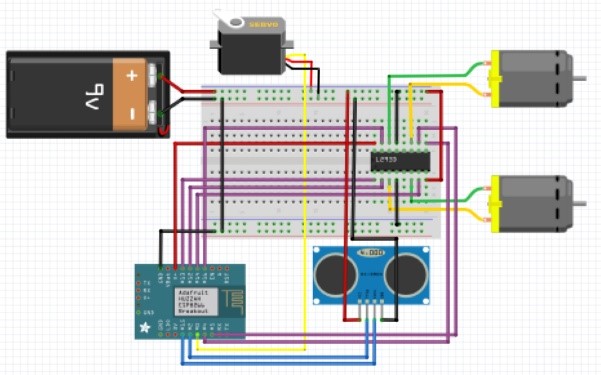
The body of the robot itself would be 3D printed with PLA filament. An ESP8266 board would be used as the brains of the robot since it can be easily programmed in an Arduino IDE. A 7.4V Li-Po powers all the components by means of a simple parallel circuit. Note that in the circuit diagram there is a 9V battery, this is a representation of the Li-Po. If this was not enough power, a separate 3.7V battery can be used to power the board while the 7.4 battery powers the components. An SG90 Micro Servo is used to drive the arm up and down, while two DC Motors are used to drive the wheels of the robot. These motors are connected to a motor driver, in this case, an L293D Module. The motor driver is in charge of delivering the right amount of current to the motors and allows us to control their speed and direction. An ultrasonic sensor will allow the robot to navigate without colliding with objects. A laser sensor could also be used but those tend to be more expensive. The only real difference between an ultrasonic sensor and a laser sensor is the way they work, an ultrasonic sensor uses reflected sound waves to determine a distance, whereas the laser uses light instead. Lastly, the camera module would need its own little circuit, consisting of a camera module and an FTDI programmer as well as a 3.7V battery. The camera and ESP8266 board can communicate via Wi-Fi, where a machine learning algorithm can analyse the video feed and learn to distinguish between different items.
Main circuit diagram
Cost
The cost of the parts comes to around £60 for one robotic assistant. However, buying electronic components in bulk significantly reduces this cost. The cost of 3D printing the robot’s casing is not included in the £60, but it would not increase the total cost by more than around £10 worth of PLA filament.